
SMARTSystem Management Training Series
Training Session #12 – INVENTORY PICTURES
Purpose: To provide the information and procedures needed to add inventory pictures to the SMARTSystem.
Keywords: The following is a list of key terms used in the SMARTSystem that you should be familiar with and understand.
- Pixels – Short for Picture Element, a pixel is a single point in a graphic image. Graphics monitors display pictures by dividing the display screen into thousands (or millions) of pixels, arranged in rows and columns. The pixels are so close together that they appear connected.
- .jpg – JPG files, also known as JPEG files, are a common file format for digital photos and other digital graphics. When JPG files are saved, they use “lossy” compression, meaning image quality is lost as file size decreases. JPEG stands for Joint Photographic Experts Group, the committee that created the file type.
- .gif – Pronounced jiff or giff (hard g) stands for graphics interchange format, a bit-mapped graphics file format used by the World Wide Web. GIF supports color and various resolutions. It also includes data compression, but because it is limited to 256 colors, it is more effective for scanned images such as illustrations rather than color photos.
- .bmp – Short for “Bitmap.” The BMP format stores color data for each pixel in the image without any compression. For example, a 10×10 pixel BMP image will include color data for 100 pixels. This method of storing image information allows for crisp, high-quality graphics, but also produces large file sizes. The JPEG and GIF formats are also bitmaps, but use image compression algorithms that can significantly decrease their file size. For this reason, JPEG and GIF images are used on the Web, while BMP images are often used for printable images.
- SMARTData Services – manages information for:
- wireless database interaction with the 3190 scanner and
- capturing pictures for use with the SMARTSystem and SMARTSite.
Pre-requisites:
SMARTData Services needs to be installed and setup before pictures can be added.
Pictures need to be captured and saved in your pictures folder. Pictures can be captured in any one of 3 formats: .jpg, .gif, .bmp. See definitions of each type in the Keywords list above.
To capture pictures that will be effective on a website and in the SMARTSystem you need to adhere to the following guidelines:
- The picture should be at least 250 pixels on the longest axis (Height if Tall Picture, Width if Wide Picture).
- The picture should not be greater than 950 pixels wide. Images wider than this could potentially clip on lower resolution screens (1024×768).
- Should not be greater than 700 pixels tall. Images taller than this could potentially clip on lower resolution screens (1024×768).
Overview:
- Open the SMARTSystem and Login.
- Select the Inventory Menu and sub-menu Inventory View.
- Use the filter criteria to select the product that you would like to add a picture.
- Double click the product to show it in the Inventory Maintenance Screen.
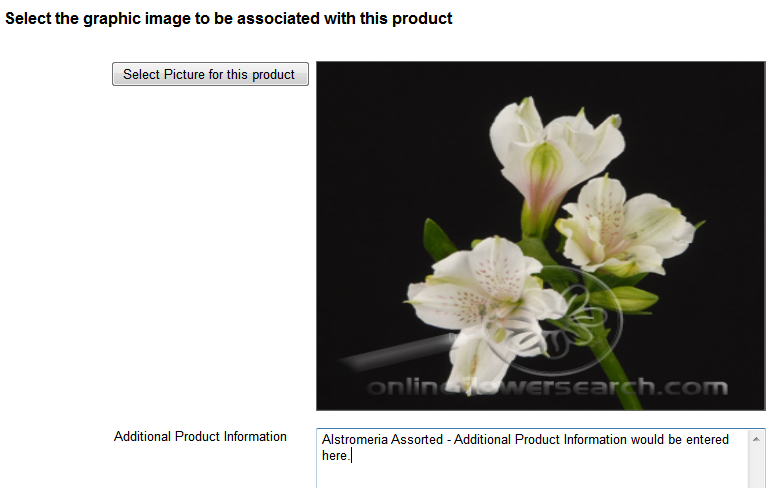
- Click the Product Picture Tab. *
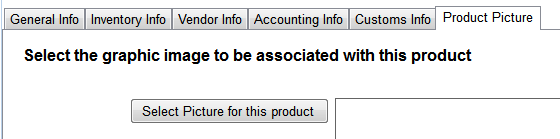
6. Click the “Select Picture for this product” button to select a picture from the folder containing your pictures.
7. Find the picture you want to associate with the product and click the “Open” button.

8. Please be aware that when the picture is shown in the square area on the screen, it will be skewed to fit the square area. This does not affect how the picture will be saved or how it will appear on the website.
9. Enter any additional product information in the Additional Product Information Text Area:
10. After you have entered the Additional product information Click the Modify button to Save your changes
* NOTE: If the Product Picture Tab is not available please contact FCS Support and ask them to install the SMART Data Services module on your Server.
SMARTSystem Management Training Series
Training Session #7B – Physical Inventory using Laptop or Tablet
Purpose: To capture physical inventory counts using one or more laptops and/or tablets at multiple locations.
Keywords: The following is a list of key terms used in the SMARTSystem that you should be familiar with and understand.
- SKU – Is an abbreviation for stock keeping unit that identifies a specific stock item in inventory. In the SMARTSystem, SKU can be your Product Code, the UPC or GTIN numbers.
- RECORD SELECTOR – Is used on some screen displays to highlight a specific record. It is the left most column and when clicked it highlights that record and shows an arrow symbol (>).

Pre-requisites:
- Laptop or tablet
- Wired or wireless connection to the Server
- Bar Code Scanner connected to the laptop/tablet
Overview:
The Physical Inventory process consists of 4steps:
- Scanning – the bar code of inventory items is the first step. The bar code can be your product code, UPC or GTIN codes,
- Stage – inventory scans from one or more devices so that like products from different locations can be consolidated,
- Close– all Physical Inventory scanning programs to prevent changes during the posting process, and
- Post– inventory quantities.
The Physical Inventory program is selected from the Inventory Menu:
INVENTORY > Physical Inventory
this sub-menu displays the following screen:

Scanning:
Using the bar code scanner, scan the item bar code and the information from the bar code will be displayed in theSKU field in the top portion of the screen above. If the code is found in the Inventory Table the product description will be displayed in the Description field and the cursor is positioned in the Quantity field.
You can Back Tab from the Quantity field to enter a repetitive Shelf Location / Note, then tab to the Quantity field and enter the item count.
This is repeated until all items are scanned and accounted for thereby completing a section or scanning area.

You can print a list of scanned items by clicking the Print button or Export them to Excel.
Items you have scanned and shown in the list have been automatically pre-staged for the next step.
Stage:
The scanned products from each laptop or tablet are staged for consolidation of like products using the Inventory Reconciliation Program.
The next thing, after everyone has completed their scanning, is to select the Inventory Reconciliation program:
INVENTORY > Inventory Reconciliation
Click the Manual Reconciliation checkbox to place this program in manual mode.

Click the blue button under Item Filter, Manage Staged Physical Inventory. The following Manage Staged SMARTScan Data will be displayed with all of the items scanned including the Workstation, Date and Time Scanned, Scanned Code (SKU), Description, Shelf Location/Note and Quantity.

When this screen opens the *Selected checkbox on the left is set to include all of the scanned items and quantities for transfer to the Inventory Reconciliation program. You can uncheck any item that you do not want to include in this process or delete the line item.
If you want to delete one or more lines click the Record Selector (holding the Shift key you can highlight multiple lines) and press the Delete Key on the keyboard. This will remove the highlighted lines from the scanned items on this Staged screen. The screen below shows a highlighted line before the Delete Key is pressed.

At this point, if you do not want to continue you can click the Exit button and close the scanned information without losing it. You can also make changes to the line items, including Quantities or deleting lines.
The second button on this screen can be used to export the items to Excel.

In a normal operation, the items scanned are automatically selected for you to transfer to the Inventory Reconciliation Quantity column for posting to inventory when you click the SAVE button. Click the first blue button to Move Selected Items to Inventory Reconciliation.
You are now ready to Post your scanned inventory quantities by pressing the SAVE button. Refer to Management Training Document #7 for information on the Inventory Reconciliation program.
Close:
Before transferring items to the Inventory Reconciliation program, make sure all scanning is completed and the Physical Inventory program is closed on all scanning devices. If any laptop or tablet has the Physical Inventory program open the following message will appear in the title bar, as in the example below:
![]()
Closing the Physical Inventory scanning program on other devices is required to transfer quantities to the Inventory Reconciliation program.
When the transfer to Inventory Reconciliation is completed the following screen will be displayed indicating that the transfer process is done and the number of records transferred.

If this process does not complete normally and display the above message, the scanned records from the Physical Inventory counts are saved in the folder:
C:\WFSData\InventoryReconciliation
The file containing the Backup of the Staged Data, with date and time stamp looks like this in the above folder:
![]()
You can restart the Manage Staged data screen by selecting Get Data from XML button on the Inventory Reconciliation program:

Post:
Before clicking SAVE, set the checkbox to “Create Excel Spreadsheet on Save” to provide an audit trail of inventory items being Posted.
The scanned records will populate the Quantity column on the Inventory Reconciliation screen. See example below and the numbers in the Quantity column. Click SAVE to process and update inventory Quantities.

You are now finished and updating your inventory physical counts is done.
Questions and Answers
If you have any questions or need support, please contact us at Support@Floralcomputer.com or call 727-483-5306for assistance.
SMARTSystem Management Training Series
Training Session # 4F – Inventory Setup to Credit a Portion of a Line Item
Purpose:
This document will describe how to setup inventory items so you can credit a portion of a bunch of flowers or a case of vases. For example, a bunch of flowers may contain 25 stems and 5 stems need to be credited.
Overview
There are 2 methods that can be used to credit a partial bunch.
- The preferred method involves having the bunch properly defined in the SMARTSystem with the number of stems in the Pack field of the inventory record.
- The other method is for handling partial returns when the client has not correctly defined their inventory items and has pack 1 defined for all products or the product being credited.
How to properly setup inventory to allow for crediting a portion of a bunch or case (method 1)
When inventory is entered the number of stems per Unit of Measure should be entered into the selling item quantity. In the example below the Carnation Red is intended to be sold in a bunch of 25 stems.
Setting up the product in this way will allow the sales reps to enter selling quantities in bunches rather than stems. For example, if the selling item quantity is set to 25 as shown – the sales person would enter 10 into the sales screen to sell 10 bunched for a total of 250 stems.

The picture below shows how 1000 stems of the carnation Red above will be shown on the Inventory View and the Quick Entry screen of the Sales Order Program. The quantity shown available for sale is 40 which is 1000 stems divided by the pack of 25.

Entering a quantity of 2 into the quick entry screen will sell 50 stems because 2 times the pack of 25 is 50.

This also displays the quantity and pack and total units correctly on the summary screen, pick ticket, and invoice:
(Summary screen and invoice shown below)


When products have been configured in this way and invoiced. Any portion of the total stems sold can be credited. The feature to do partial credits must be enabled by checking the “Use Total Units on Credits” box on the Options Tab in System Control before it can be used:
![]()
When this option is enabled and the products are configured as stated above, when a detail line is clicked in the invoice the “Item Credit” pop-up will display the total number of stems sold and any quantity up to the number of stems sold can be credited:

This result in a clear and perfectly calculated credit memo for only the stems that were credited and returned (see image of credit memo on the next page):

How to credit a portion of a line item with a product that has not been setup correctly (method 2):
If it has occurred that a customer has setup some products with pack 1 when the pack should have been some other value, then this method will need to be used to facilitate a partial credit. It is not recommended that returns be done in this way.
These products will commonly be setup with the pack shown in the description rather than being defined in the Selling Item Quantity. These items typically have a selling item quantity of 1 regardless of what the pack actually is – in the example below the pack is 10 but the inventory record defines it as 1:

The problem that this causes is the inability to use the “Use Total Units On Credits” effectively.
In this example we have invoiced 1 box of 10 Candle 10” Red, but this product was not setup with the proper pack:

(continued on next page)
If a 2 out of 10 of these candles are damaged they can be credited by entering the quantity in the Item Credit screen as a percentage of the quantity ordered. Since 2 is 20% of 10, you would enter .2 into the Quantity Adjusted box:

This will result in a credit memo for the correct dollar amount but the quantity represented on the order will be a decimal number. Also, you do not want to return a percent of the box to inventory because we do not sell a percent of a unit.

When products are setup in this way there is no way to accurately enter the quantity.
SMARTSystem Management Training Series
Training Session #4E – SMARTSystem Inventory Internal Transfer Cost Value Calculations
Purpose: The purpose of this document is to define how the cost values are calculated during both a straight transfer and a consolidation transfer. This document will cover the calculations used for WAC and WAC2 and Non-WAC transactions.
Definitions: The following is a list of key terms used in the SMARTSystem that you should be familiar with and understand.
- WAC – Is an acronym meaning Weighted Average Cost. There are several different ways of calculating WAC and we call them WAC1 and WAC2.
- WAC 1– Will re-compute a new WAC value based on all open inventory lots:
- The value of all open lots is computed and divided by the total number of units on open lots to determine the current WAC.
- For any product when inventory goes to zero, the Average Landed Cost is also set to zero and the WAC calculations start over.
- The calculated WAC value is stored in the Average Landed Cost field in the inventory record matching the Product Code, as shown below:

- WAC 2 – Utilizes the Average Landed Cost field from the Inventory Table to compute a new value based on receiving new produce:
- Each time a new product is added to inventory the Average Landed Cost (stored in the inventory record) is multiplied by the Total Units On Hand to determine the current stock value.
- The value of the new product (Quantity * Cost) is added and the total current value from the previous step and divided by the total number of units (On Hand + New Quantity) to determine the new WAC value.
- The calculated WAC2 value is stored in the Average Landed Cost field in the inventory record matching the Product Code to be used the next time product is received. The Average Landed Cost does not reset when inventory is zero.
- STRAIGHT TRANSFER – A straight transfer is when one product is directly transferred to another product.
- CONSOLIDATION TRANSFER – This is the process of combining multiple products into a single product, such as a bouquet.
Overview
Transfer Cost Calculations
This section will discuss how the WAC is computed for each type of internal inventory transfer. Non-WAC or Current Landed Cost is also referenced.
Straight Transfer:
- The following procedure is followed to compute the cost of the products involved in a straight transfer:
- The FROM Side of the transaction (reduction)
- When WAC 1 or WAC 2 are set in System Control
- The Average Landed Cost from the inventory record for the product code is used for the reduction adjustment
- When WAC is NOT selected (Non-WAC)
- Adjustment Cost = Per Unit Cost + Per Unit Freight Cost for that item or Landed Cost.
- When WAC 1 or WAC 2 are set in System Control
- Then TO Side of the transaction (increase)
- A new Receiving Lot is created (production) and an adjustment record is written
- For WAC the Adjustment cost is set as:
- The Average Landed Cost of the “FROM” product is used as the Cost of the TO Product to create the Receiving Lot and Adjustment Record
- When using WAC 1
- After the New Receiving Lot is created the function to compute the new WAC is run and the resulting new WAC value is stored in the Average Landed Cost field in the inventory record
- When using WAC 2
- The new WAC (computed as defined in the Definition area above) for the product code associated with the FROM record is creates the Receiving Lot and Adjustment records. This WAC value takes the newly transferred item into account.
- The new WAC 2 value is stored in the Average LandedCost field in the inventory record
- The FROM Side of the transaction (reduction)
Consolidation Transfer
- When several products are used to create a bouquet the following procedure is followed to compute the cost of the products involved in a Consolidation transfer:
- The Consolidation transfer allows the user to set the quantity of TO product to create from the FROM Products
- The FROM Side of the transaction (reduction)
- When using WAC 2
- The Average Landed Cost for the FROM products are used to create the Reduction Adjustment for the From Product.
- This value is stored as Adjustment Cost to be used in the TO side of the transaction
- The Average Landed Cost for the FROM products are used to create the Reduction Adjustment for the From Product.
- When using WAC 1 or the Non-WAC option is selected
- The landed cost of the product is used and stored as the Adjustment Cost
- When using WAC 2
- The TO side of the transaction
- The Total Cost ([FROM Product Adjustment Costs] x[FROM Transfer Quantity]) of all of the FROM Products is collected and then divided by the Consolidation Quantity that was entered on the Consolidation confirmation screen to arrive at the cost of the TO product (see example below).
- WAC 1, WAC 2, and Non-WAC options:
- This cost is used to Create a receiving record and an adjustment record
- Regardless of which WAC option is used, this new cost is stored in Inventory Record in the Current Landed Cost.
- WAC 1, WAC 2, and Non-WAC options:
- The Total Cost ([FROM Product Adjustment Costs] x[FROM Transfer Quantity]) of all of the FROM Products is collected and then divided by the Consolidation Quantity that was entered on the Consolidation confirmation screen to arrive at the cost of the TO product (see example below).
- ForWAC 1:
- The procedure to recalculate WAC by lots is called after the receiving lot is created and the resulting new WAC value is stored in the Average Landed Cost
- For WAC 2:
- The process that created the receiving record and inventory adjustment returns the WAC 2 value that is then stored in the Inventory Average Landed Cost field
- The FROM Side of the transaction (reduction)
WAC 2 Consolidation Transfer Example
Using the following Inventory Adjustments Report to identify products transferred which can be exported to excel, if you need more flexibility.
A Transfer works this way: An Inventory Adjustment Record is generated from each of the FROM products and immediately after that the TO product. I have highlighted two transfers below which gives you date, time, who did the transfer, what products, quantity were transferred, costs at the time of the transfer, and what program created the adjustment. See the formulas for generating the TO costs.

In the 2nd transfer creating BOUQWFSSMA the following calculations are done.
Costs are accumulated for each FROM product, accumulated and divided by the TO quantity for a new Average Landed Cost:
QTY COST
- 4 x 2.683 = 10.732
- 26 x 1.881 = 48.906
- 100 x .302 = 30.200
- 14 x 3.552 = 49.728
- 2 x 3.668 = 7.336
- 8 x 3.330 = 26.640
- 4 x 3.931 = 15.724
- 3 x 3.300 = 9.900
- 7 x 3.300 = 23.100
Total $ 222.266
Divided the Total cost by the TO quantity of 3 products = 74.0886 for the Average Landed Cost of the new item.
Note: that the TO quantity is very important to calculate the correct Average Landed Cost.
Questions and Answers:
If you have any questions or need support, please contact us at Support@Floralcomputer.com or call 727-483-5306 for assistance.
SMARTSystem Management Training Series
Training Session #4C – SMARTSystem Inventory Transfers
Purpose: To transfer inventory from one or many products into a single product.
Overview
From the Inventory Menu, the sub-menu Internal Inventory Transfer is selected.

After clicking the sub-menu item to show the following screen:

Select the products that you would like to transfer inventory FROM in the top panel by selecting the filters that apply to the products you would like to transfer and clicking the Find button in the top panel.

This action will display all of the matching lots that have an On-Hand quantity greater than zero.
Next, enter the “Transfer Quantity” that will reduce the On-Hand quantity in the FROM when the transaction is completed. In the example below, 25 was entered in the Transfer Quantity column on the first line item. By tabbing out of the field or clicking the cell, that line item will be move to the center panel showing the Selected Transfer Items.

Next, enter the search criteria in the bottom panel, click FIND and it will display all matching inventory items regardless of their On-Hand quantity.

Now that you have the products that you want to transfer FROM in the center panel, and the products displayed to select a transfer TO in the bottom panel, check the “Selected” box for the product that you want to transfer TO so the system knows where to put the transferred quantities.
Before clicking the TRANSFER button review the FROM Quantities and the TO product to make sure that you are satisfied with the information before clicking the TRANSFER button.
Once you have confirmed the FROM and TO information on the screen click the TRANSFER Button to execute the Transfer.

A confirmation that the Transfer was made is displayed “Internal Inventory Transfer Complete”.

The transfer is PERMANENT. Once the transfer is done there is no UNDO option. Please be VERY sure that the information you have entered is correct.
Product Cost is also transferred.
When you click OK, Internal Inventory Transfer Complete the FROM and TO data grids will be refreshed showing the new quantities available after the transfer.
The transfer process will create two quantity adjustment records for each lot that product is transferred from:
- The 1st record indicates that the FROM quantity was reduced by the inventory transfer process
- The 2nd record indicates the quantity of product that was transferred TO the target product.
The inventory adjustment records can be viewed from the Reports > Inventory Reports > Inventory Adjustments screen
Questions and Answers
If you have any questions or need support, please contact us at Support@Floralcomputer.com or call 727-483-5306for assistance.
SMARTSystem Management Training Series
Training Session #4B – SMARTSystem Inventory Quantity HOLD Options
Purpose: To provide options to place inventory quantities on HOLD.
Keywords: The following is a list of key terms used in the SMARTSystem that you should be familiar with and understand.
- On-Hand Inventory – Inventory in the computer that represents what is in the warehouse. On-Hand includes the On-Hold quantity.
- On-Hold – is an inventory quantity set aside in the computer and removed from the Net Available Inventory for sale by the sales staff.
- Net Available Inventory – On-Hand Inventory less On-Hold Inventory is the Net Available Inventory for sale.
Training Areas for this Session:
Placing Product On-Hold
There are several ways that product quantities can be placed On-Hold. These include:
- Under the Management Menu, the sub-menu Inventory Management program allows the placement of HOLD quantities on specific inventory lots received.
- Pre-books allocated to Purchase Orders when received are automatically placed On-Hold to prevent them from being sold in your open market inventory.
- The Inventory View provides access to place a quantity On-Hold when you right click the product and select View Inventory Detail Items from the Inventory.
- The product on an entire Purchase Order can be put On-Hold by clicking the “Hold Order” button on the Purchase Order Entry screen.
- For Growers: the sub-menu under the End-of-Day Menu, Auto Hold for Pre-Book Orders can be run by the Sales Manager to automatically place inventory product entered into the SMARTSystem from harvest to anOn-Hold status based on the delivery date to customers.

Practice Drills
The purpose of Practice Drills is to get you more familiar with the SMARTSystem and comfortable using it.
- Login into SMARTSystem.
- Select the Inventory View and locate 1 product to place product on HOLD.

- Go to the MANAGEMENT Menu, select Inventory Management and search for the inventory item, in this example the product is ACACIA. Enter 50 into the *Qnty On Hold field as shown below:

- Click SAVE at the bottom of the screen to save your entry:

- When you click SAVE the following message will appear when all HOLDS are SAVED.

- Go back to the Inventory View and verify that 50 items are on HOLD.

- Another way to set and clear HOLDS is to right clicking the product line and select View Inventory Detail Items:

- Set the On Hand Hold Quantity (highlighted below) to zero

- Click SAVE to update the On Hand Hold to zero and see message confirming the change was saved:

Questions and Answers
If you have any questions or need support, please contact us at Support@Floralcomputer.com or call 727-483-5306for assistance.
SMARTSystem Management Training Series
Training Session #4A – SMARTSystem Inventory Maintenance
Purpose: To gain a working knowledge of the Inventory Table and maintenance of inventory items.
Keywords: The following is a list of key terms used in the SMARTSystem that you should be familiar with and understand.
- On-Hand Inventory – Inventory in the computer that represents what is in the warehouse/cooler. On-Handincludes the On-Hold quantity.
- On-Hold – is an inventory quantity set aside in the computer and removed from the Net Available Inventory for sale by the sales staff.
- Net Available Inventory – On-Hand Inventory less On-Hold Inventory is the Net Available Inventory for sale.
- Product Type – Is similar to Product Category but used to establish margins for each Customer Sales Level and when printing the Pick Ticket. Pick Ticket products are organized in groups by product type.
- Unit of Measure – Is the standard of measurement for physical quantities
Training Areas for this Session:
Inventory View
The Inventory View provides user access to Inventory Items and the purchase order detail items. Select the Inventory Main Menu > Inventory View and the following screen shows a list of Inventory Items.
Initially, the screen will display all products in alphabetical sequence by Product Description and as shown below the information can be filtered by Category, Sub-Category and Subset:

When you highlight an inventory line item you can:

- Double click to open the detail view for that inventory item or
- Right click, to show options to Open Detail View or View Inventory Detail Items.
This is a view of inventory detail from purchase orders or inventory receiving:

Below, the checkbox in the upper right is used to display only inventory with On-Hand balances. To show all inventory items, un-check the box.

You may have a need to export your displayed inventory items to excel. If so, you can include additional information when you check the second box to “Show Category, Sub-Category and Image Links.” Image Links are links to your pictures associated with the inventory item. This button, at the bottom of the screen, will export inventory items to excel:
![]()
Selection options to display inventory items on the Inventory View are:
- Primary Vendor
- Category
- Sub-Category Filter
- Subset Filter (used for color, variety, etc.)
- Product Code/SKU (partial code entered will list all matching)
- Description Search
- MFG Code Search
The bottom of the Inventory View screen will:
- PRINT a list of items you have selected
- Create a NEW inventory item
- View Inventory Detail Items & Enter Adjustments
- Export to Excel
- Export IFD Data
- Clear Searches
- Refresh Screen
![]()
Inventory Item Maintenance
Inventory Items are the focal point of the SMARTSystem.
By selecting the Inventory Menu you can access your Inventory using the Inventory View or Inventory Entry. The Inventory Menu lists many sub-menu selections to manager your inventory items.
There are certain pre-requisites that are required for inventory maintenance to function smoothly. These pre-requisites on the Inventory Menu and include:
- Product Type
- Product Category Filter
- Product Sub-Category Filter
- Product Subset Filter
- Product Size
- Unit of Measure View
- Unit of Measure to create Associated Products
- Item LocationSelect the following from the Purchase Orders Main Menu:
- Vendor
- Buyer
On the Inventory Main Menu, select Product Filter Maintenance to access most of the items listed above:

The Inventory Table Maintenance program has 6 tabs. These tabs are:
- General Info
- Inventory Info
- Vendor Info
- Accounting Info
- Customs Info
- Product Picture
General Info Tab:
The General Info Tab provides for the basic, minimum setup information needed for a new Inventory Item as illustrated below.

Required fields to create an inventory item are:
- Category
- Sub-Category
- Product Code
- Description
- Product Type
- Purchase Unit of Measure
- Purchase Item Quantity
- Selling Unit of Measure
- Selling Item Quantity
Each Inventory Item has specific filters assigned to it for quick access to inventory information. These filters are Category, Sub-Category, Subset and Size as shown.
Each of these filters are pre-requisites and if you are in the middle of creating an inventory item that does not have a filter defined, select Product Filter Maintenance from the Main Inventory Menu and create it. After it is created, select the Refresh List button (upper right) to make it available in the drop down menu.
The “Generate Product Code” button will be highlighted for a new entry. If you click it, the Product Code for this inventory item will be created from the codes used from each of the filters you selected. Normally, this button is not used and you enter a Product Code with a maximum length of 14 characters.
The Product Description can be up to 50 characters, but its best to keep it under 35 characters for easy readability on screens and reports.
You can set a color background for each description by clicking the “Select Background Color” button and selecting a color.
The Product Type has two main purposes:
- To establish the percent of Mark-up or Margin for each inventory item, and
- To organize products by Product Type printed on the Pick Ticket.
The SMARTSystem will calculate your preferred Mark-up or Margin based on Product Type specified for each inventory item and apply that margin to Customer Sales Price Levels. Each customer is assigned a Sales Price Level.
Typically, your Sales Price Level 1 would be your most widely used margin down to Price Level 5 as your lowest margin. Only Price Level 1 is required. See example below:

Products on the Pick Ticket are organized by Product Type. In the example below, Fresh Flowers and Supplies are Product Types.

Next, the Units of Measure are defined in the Units of Measure Table as illustrated below:

In the Inventory record as illustrated below, the Purchase Unit of Measure is the default box size defined in the Unit of Measure Table and will be used to automatically create purchase order entries when the option is selected. Associated with this entry is the default Purchase Item Quantity showing the number of items, stems, pieces, etc. that would normally be packed in the Purchase Unit of Measure entry.

Selling Unit of Measure and Selling Item Quantity defines the way you sell product: stems, bunches, each, etc. and the quantity. For example, Roses sold by bunch containing 25 stems.
Units per Tag are used to calculate the correct number of tags to print. A Tag or Sales Label is used to tag the product set aside for customers. The following is a Tag without bar code:

The following check boxes are used to set characteristics of each inventory item: ![]()
Current Landed Cost is updated when a purchase order is received or costs are entered when using Inventory Receiving program for non-purchase order items. 
Average Landed Cost is updated depending upon the cost options specified in System Control. Select Menu Control Info menu > System Control > Options:
![]()
Sales Price Levels 1 – 5 are updated automatically when the PO is received unless you have Manually Updated Sales Prices set in System Control:
![]()
When Manually Update Sales Prices are unchecked, the purchase order receiving process will update Sales Price Levels 1 – 5 based on your Price Level Factors in the Product Type for each inventory item. Otherwise, when the checkbox is set, you control the Sales Price Levels manually.
The Buyer Code is used to identify who is responsible for buying this product.
Retail Price (for Labels) is used for retail price labels.
Print Receiving Labels checked on will force the printing of box receiving for each purchase order received. There is an option in the purchase order to set this option when you want to print Receiving Labels for boxes.
Inventory Info Tab:
There are no required fields on this screen:

Item Locations are defined in the Item Location Table. Using the drop down menu you can select the location of this Item. Product Shelf Location and quantity can be updated automatically using the 3190 wireless scanner for physical inventory counts.
Minimum and Maximum Stock can be updated using a spreadsheet or on this screen. These fields are used in several Buyer Reports.
The On Hand, On Hand Hold, and On Order are automatically updated and you cannot change this information.
Cur. Purchase Item Cost, Cur. Freight Cost Per Item, Avg. Purchase Item Cost, and Avg. Freight Cost Per Item are automatically updated when a purchase order is received.
The Costing Method field is not currently being used.

UPC and GTIN Codes is entered and stored in these fields. There are several ways to capture this information, includingInventory Reconciliation.
Item Classification will default to “Stock Item” if not entered.
Old Inventory Code, Substitution, Special Note Information, Special Order Information and Default Shipping Description provide for free form entry and are not restricted.
Vendor Info Tab:
This tab is used primarily for hard goods. The Preferred Vendors are identified on this screen. There are no required fields on this screen:

Accounting Info Tab:
These are required fields on this screen to create an inventory item:
- G/L Sales Account
- G/L Inventory Account
- G/L COGS Account
G/L Adjustment Account

Select the Control Info Main Menu to select and set G/L Accounts.
This accounting information can be set manually for each inventory item or globally. Global assignment can be found under the Management Menu, sub-menu Assign Inventory GL Accounts.
Customs Info Tab:
The Customs Info screen is used when you are clearing your own flowers.
There are no required fields on this screen:

Product Picture Tab:
Pictures can be captured and additional product information entered.
Before pictures can be selected, SMARTData Services must be installed.
Additional Product Information is a large area for text and normally used with the e-commerce SMARTSite.
There are no required fields on this screen:

Refer to Management Training Series #12 for more detailed information about Pictures. Some of our preferences for pictures are:
- The preferred format is .jpg or .bmp.
- Must have URL assignments in:
- Control Info > System Control> Doc & Dir Config
- Add the URL’s for data and the root then SAVE:

-
- Create a New Inventory Item using CopyAn easy way to create a new inventory item with a minimum amount of data entry is to select a similar inventory item, bring it up for display and click the “Copy to New Item” button.
This will duplicate all of the inventory information except you will be required to enter a Product Code and Description for the new item you are creating.
- Create a New Inventory Item using CopyAn easy way to create a new inventory item with a minimum amount of data entry is to select a similar inventory item, bring it up for display and click the “Copy to New Item” button.
Practice Drills
The purpose of Practice Drills is to get you more familiar with the SMARTSystem and comfortable using it.
- Login into SMARTSystem
- Go to the INVENTORY Menu, select INVENTORY VIEW to search for a specific inventory item and when found double click it.
- Click through each tab and get familiar with the content on each screen.
- Add a new Inventory Item.
Questions and Answers
If you have any questions or need support, please contact us at Support@Floralcomputer.com or call 727-483-5306 for assistance.
-

There are two types of Inventory Adjustments:
- Type 1 – Quantity Adjustments
- Type 2 – Cost only Adjustments
Introduction to SMARTScan
SMARTScan is physical inventory software that was developed for the Motorola MC3190 mobile computing platform. The software was developed to fill the industries need to maintain accurate physical inventory counts and minimize labor costs.
SMARTScan allows the user of the MC3190 to scan the barcode on a product, enter its shelf location, the Quantity, then save the item and move on to the next product.
SMARTScan interfaces directly with the SMARTSystem line of PC Software applications for hand’s free inventory reconciliation.
The layout of the data that is collected by the mobile device is at the end of this document for easy integration with your existing inventory software.
SMARTScan™ V1.2 Operating Instructions
| To start SMARTScan: |
Turn on the unit
Press the Red button on the lower right corner of the unit
With your Finger or the Stylus:
Tap the “Start Button”
Then Tap the SMARTScan icon.
** If your Mobile Device is equipped with the Motorola App Center you can simply tap the SMARTScan icon to start the program.
SMARTScan Operation |
After the SMARTScan software is started the following instructions can be followed for to enter Physical Inventory Counts and Locations.
Refer to the figures in the SMARTScan™ Device Screen Reference for visual aids.
Entering Inventory Counts: |
The following instructions describe how to enter physical inventory items:
- Enter the product Shelf location
- Repeat until done with Shelf
- Scan the barcode
- Use the numeric Keypad to enter quantity
- Press ENTER on the keypad or tap save button
Starting a new Shelf: |
These instructions describe how to complete the current shelf and start working with a new shelf:
- Tap New Shelf button
- Enter the product Shelf location
- Repeat until done with Shelf
- Scan the barcode
- Use the numeric Keypad to enter quantity
- Press ENTER on the keypad or tap save button
Editing Detail Records / Making Corrections |
Follow these instructions to make changes to data stored in the mobile device:
- Locate the item in the Data Grid in lower portion of the screen
- Tap the item you wish to modify with Finger or Stylus
- Edit the desired information by tapping into the field containing the incorrect information
- Press enter in Quantity field or tap Save to complete the correction
CLEAR ALL SCANNED ITEMS |
WARNING! Performing this action will PERMANENTLY delete all of the physical inventory records stored in the device.
To PERMANENTLY DELETE all physical inventory data stored in the mobile device follow these instructions:
- Double tap the Data Grid with your finger or Stylus
- You will be prompted twice to confirm
- See Figure 2 and Figure 3 in the Device Screen Reference
- Confirm both times and data will be cleared
- See Figure 2 and Figure 3 in the Device Screen Reference
SMARTScan™ Device Screen Reference
Overview |
This section contains screen shots of the SMARTScan™ device screens for user reference.
Reference Screen Shots |
Figure 1:
Main SMARTScan Inventory Screen:

Figure 2:
If a data line is double-tapped the following screen appears to confirm that the user wants to delete all of the data in the device:

Figure 3:
If the user confirms that they want to delete all of the data in the device they are prompted a second time to be absolutely sure that they know all data will be permanently deleted:

SMARTScan™ Programmer Data Schema Reference
How the Data is Stored |
The data collected by the SMARTScan software is stored as XML files in the root folder of the device. This is generally denoted as “\” when looking at the device.
All edits and modifications are stored in InventoryQuantities.xml
XML Record Layout (Schema): |
The fields contained in each XML record of InventoryQuantities.xml are:
GUID:
Globally Unique Identification Value for the record
ScannedCode:
UPC value scanned by barcode reader (note these do not always contain the check digit from the scanned barcode)
Shelf Location:
The shelf location entered by the user
Quantity
The quantity entered by the user
DateTimeStamp:
The Date and Time according to the Mobile Device at the time the record was written.