
SMARTSystem Management Training
Training Session #14 – Physical Inventory
Purpose: To capture physical inventory counts using laptops at multiple locations.
Keywords: The following is a list of key terms used in the SMARTSystem that you should be familiar with and understand.
- SKU is an abbreviation for stock keeping unit that identifies a specific stock item in inventory. In the SMARTSystem, SKU can be your Product Code, the UPC or GTIN numbers.
Pre-requisites:
- Laptop or tablet
- Wired or wireless connection to the Server
- Bar Code Scanner connected to the laptop/tablet
Overview:
The Physical Inventory process consists of 4steps:
- Scanning the bar code of inventory items is the first step. The bar code can be your product code, UPC or GTIN codes,
- Stage inventory scans from one or more devices so that like products from different locations can be consolidated,
- Close all Physical Inventory scanning programs to prevent changes during the posting process, and
- Post inventory quantities.
The Physical Inventory program is selected from the Inventory Menu:
INVENTORY > Physical Inventory
which displays the following screen:
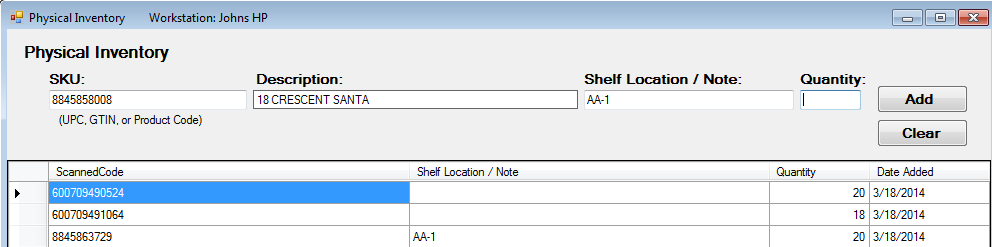
Scanning:
Using the bar code scanner, scan the bar code and the information from the bar code will be displayed in the SKU field in the top portion of the screen above. If the code is found in the Inventory Table the product description will be displayed in the Description field and the cursor is positioned in the Quantity field.
Back tab to enter a repetitive Shelf Location / Note, then tab to the Quantity field and enter the item count.
This is repeated until all items are scanned and accounted for thereby completing your area.
Stage:
When scanning is completed, the items scanned are listed as illustrated on the screen below:

The next thing, after everyone has completed their scanning, is to select the Inventory Reconciliation program:
INVENTORY > Inventory Reconciliation
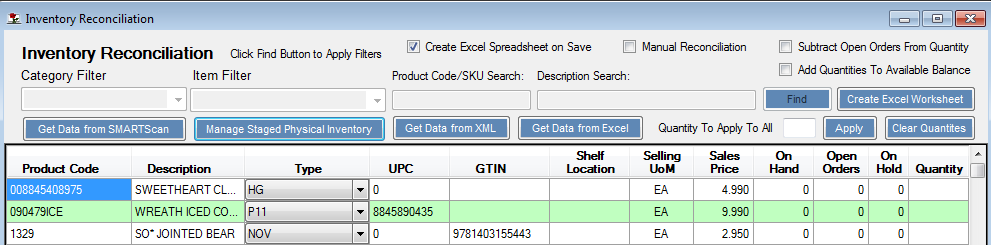
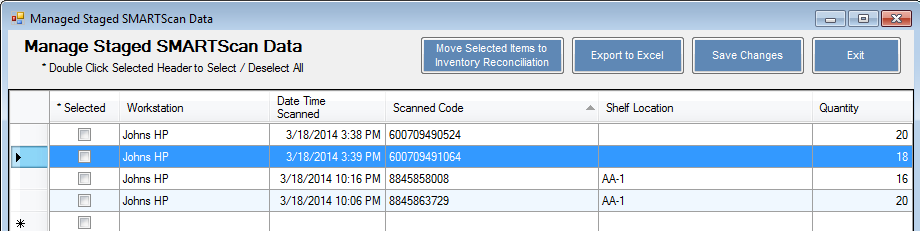
Click the blue button under Item Filter, Manage Staged Physical Inventory. The following Manage Staged SMARTScan Data will be display with all of the items scanned including the Workstation, Date and Time Scanned, Scanned Code (SKU) Shelf Location and Quantity.

At this point you can click the Exit button and close the scanned information without losing it. You can also make changes to the line items, including Quantities or deleting lines as shown below.
If you want to delete one or more lines, highlight the lines (holding the Shift key you can highlight multiple lines) and press the Delete Key on the keyboard. This will remove the highlighted lines from the scanned items.
The second button can be used to export the items listed to Excel.

Normally, you select the items you want to Post. You can select them individually or all of them by double clicking the *Selected heading. Once the items are checked that you want to Post to update inventory, click the first blue button Move Selected Items to Inventory Reconciliation.
You are now ready to Post your scanned inventory quantities.
Close:
Before posting, make sure all scanning is completed and the Physical Inventory program is closed. Closing the Physical Inventory scanning programs will prevent changes during the posting process.
Post:
The scanned records will populate the Quantity column on the Inventory Reconciliation screen and click SAVE to process.
Keep the checkbox marked that will Create Excel Spreadsheet on Save to provide an audit trail for each Post.
Questions and Answers
If you have any questions or need support, please contact us at Support@Floralcomputer.com or call 727-483-5306 for assistance.
SMARTSystem Management Training Series
Training Session #7B – Physical Inventory using Laptop or Tablet
Purpose: To capture physical inventory counts using one or more laptops and/or tablets at multiple locations.
Keywords: The following is a list of key terms used in the SMARTSystem that you should be familiar with and understand.
- SKU – Is an abbreviation for stock keeping unit that identifies a specific stock item in inventory. In the SMARTSystem, SKU can be your Product Code, the UPC or GTIN numbers.
- RECORD SELECTOR – Is used on some screen displays to highlight a specific record. It is the left most column and when clicked it highlights that record and shows an arrow symbol (>).

Pre-requisites:
- Laptop or tablet
- Wired or wireless connection to the Server
- Bar Code Scanner connected to the laptop/tablet
Overview:
The Physical Inventory process consists of 4steps:
- Scanning – the bar code of inventory items is the first step. The bar code can be your product code, UPC or GTIN codes,
- Stage – inventory scans from one or more devices so that like products from different locations can be consolidated,
- Close– all Physical Inventory scanning programs to prevent changes during the posting process, and
- Post– inventory quantities.
The Physical Inventory program is selected from the Inventory Menu:
INVENTORY > Physical Inventory
this sub-menu displays the following screen:

Scanning:
Using the bar code scanner, scan the item bar code and the information from the bar code will be displayed in theSKU field in the top portion of the screen above. If the code is found in the Inventory Table the product description will be displayed in the Description field and the cursor is positioned in the Quantity field.
You can Back Tab from the Quantity field to enter a repetitive Shelf Location / Note, then tab to the Quantity field and enter the item count.
This is repeated until all items are scanned and accounted for thereby completing a section or scanning area.

You can print a list of scanned items by clicking the Print button or Export them to Excel.
Items you have scanned and shown in the list have been automatically pre-staged for the next step.
Stage:
The scanned products from each laptop or tablet are staged for consolidation of like products using the Inventory Reconciliation Program.
The next thing, after everyone has completed their scanning, is to select the Inventory Reconciliation program:
INVENTORY > Inventory Reconciliation
Click the Manual Reconciliation checkbox to place this program in manual mode.

Click the blue button under Item Filter, Manage Staged Physical Inventory. The following Manage Staged SMARTScan Data will be displayed with all of the items scanned including the Workstation, Date and Time Scanned, Scanned Code (SKU), Description, Shelf Location/Note and Quantity.

When this screen opens the *Selected checkbox on the left is set to include all of the scanned items and quantities for transfer to the Inventory Reconciliation program. You can uncheck any item that you do not want to include in this process or delete the line item.
If you want to delete one or more lines click the Record Selector (holding the Shift key you can highlight multiple lines) and press the Delete Key on the keyboard. This will remove the highlighted lines from the scanned items on this Staged screen. The screen below shows a highlighted line before the Delete Key is pressed.

At this point, if you do not want to continue you can click the Exit button and close the scanned information without losing it. You can also make changes to the line items, including Quantities or deleting lines.
The second button on this screen can be used to export the items to Excel.

In a normal operation, the items scanned are automatically selected for you to transfer to the Inventory Reconciliation Quantity column for posting to inventory when you click the SAVE button. Click the first blue button to Move Selected Items to Inventory Reconciliation.
You are now ready to Post your scanned inventory quantities by pressing the SAVE button. Refer to Management Training Document #7 for information on the Inventory Reconciliation program.
Close:
Before transferring items to the Inventory Reconciliation program, make sure all scanning is completed and the Physical Inventory program is closed on all scanning devices. If any laptop or tablet has the Physical Inventory program open the following message will appear in the title bar, as in the example below:
![]()
Closing the Physical Inventory scanning program on other devices is required to transfer quantities to the Inventory Reconciliation program.
When the transfer to Inventory Reconciliation is completed the following screen will be displayed indicating that the transfer process is done and the number of records transferred.

If this process does not complete normally and display the above message, the scanned records from the Physical Inventory counts are saved in the folder:
C:\WFSData\InventoryReconciliation
The file containing the Backup of the Staged Data, with date and time stamp looks like this in the above folder:
![]()
You can restart the Manage Staged data screen by selecting Get Data from XML button on the Inventory Reconciliation program:

Post:
Before clicking SAVE, set the checkbox to “Create Excel Spreadsheet on Save” to provide an audit trail of inventory items being Posted.
The scanned records will populate the Quantity column on the Inventory Reconciliation screen. See example below and the numbers in the Quantity column. Click SAVE to process and update inventory Quantities.

You are now finished and updating your inventory physical counts is done.
Questions and Answers
If you have any questions or need support, please contact us at Support@Floralcomputer.com or call 727-483-5306for assistance.
SMARTSystem Management Training Series
Training Session #7A – SMARTSystem Inventory Reconciliation
Purpose: How to use Inventory Reconciliation.
Keywords: The following is a list of key terms used in the SMARTSystem that you should be familiar with and understand.
Inventory Reconciliation – A process of updating the computer with physical inventory counts.
Data Grid – Is a type of display screen used with Inventory Reconciliation.
On-Hand Inventory – Inventory in the computer that represents what is in the cooler/warehouse. On-Hand includes the On-Hold quantity.
On-Hold – An inventory quantity set aside in the computer and removed from the Available Inventory for sale by the sales staff.
Available Inventory – On-Hand Inventory less On-Hold Inventory is the Available Inventory for sale.
Sales Orders – A Sales Order contains product scheduled for delivery to the customer. All products on a sales order have been removed from the On-hand inventory in the computer and ready for delivery/shipping.
Pre-book Orders – A Pre-book represents product scheduled for future delivery and these products have not been removed from the On-Hand inventory in the computer.
Invoiced Orders – Sales Orders invoiced for delivery to the customer.
Pre-packs – Products in the cooler that have been packed and staged for delivery/Shipment. This needs to be counted if using the “Subtract Open Orders from Quantity” option in Inventory Reconciliation.
Cooler Count – Quantity of product in the cooler that is not invoiced and would not include Pre-packs.
Open Orders – Products on Sales Orders (not invoiced) that have been removed from the On-Hand Inventory Balance.
Quantity – Cooler count quantity used on the Inventory Reconciliation Screen which is uploaded from an Excel spreadsheet or scanning device or entered by hand.
Net Avail – Net Avail (Available) is the Cooler Count, less Open Orders. This is will be the new On-hand Inventory quantity after reconciliation.
Auto-Hold – This is a special Growers process usually run by the Sales Manager to reserve products for fulfillment of Pre-book orders. This is reserved by putting the products On-hold through the date selected in the program. Wholesalers use Pre-Book Allocations to obtain this result.
SMARTScan – Is a specially written series of programs that run on the Motorola MC-3190 hand-held barcode scanner below. These programs directly integrate with the SMARTSystem and can operate in a wireless environment.

Overview:
The purpose of this document is to detail how to create multiple Excel worksheets that can be used for physical inventory cycle count without causing conflicts during the reconciliation process.
Note: This process is designed to work with a handheld scanner and this procedure defines how to use it manually without the scanner.
Select Inventory Reconciliation by using the following Menus:
INVENTORY > INVENTORY RECONCILIATION
Creating Worksheets for Inventory Counts:
To create a worksheet of inventory records, open the Inventory Reconciliation program and click the Manual Reconciliation check box:

After the Manual Reconciliation box is checked ALL of your inventory products are automatically selected and displayed or you can identify specific products from the options provided (Category, Item, etc.):

Confirm selection for specific products then click the Find button to populate the data grid.
After you have clicked the Find button, click the Create Excel Worksheet button to create the spreadsheet that will be used for entering your physical inventory counts.

When you click the “Create Excel Worksheet” button the following screen will appear:

NOTE: The “Export to Excel” button will only appear if your computer has Microsoft Excel installed.
Click the “Export to Excel” button to save the Excel Worksheet to your hard drive.
The Excel file is created as an Excel file in XML format. Older versions of Microsoft Excel may not be able to read this format.
You are now ready to enter your inventory into your new spreadsheet.
Capture you inventory count for this cycle and when complete go to the next step.
Safely Recording Inventory Data:
This section will describe how to safely import the Inventory Records using Inventory Reconciliation and the Excel spreadsheet created using the procedures defined in “Creating Worksheet Records” above.
Before executing this procedure, please confirm that there is no inventory receiving activity being run on any other workstation.
To safely reconcile the inventory data follow these steps:
Make sure that the Excel Spreadsheet containing the data you intend to bring into Inventory Reconciliation is copied onto the computer that is going to run the Inventory Reconciliation before you start this procedure.
Open the Inventory Reconciliation program and click the Manual Reconciliation check box:
After the Manual Reconciliation box is checked select the inventory being processed from the options below, as done in the create worksheet section above:
Confirm selection for specific products then click the Find button to populate the data grid.
Click the “Get Data From Excel” button to select the Excel or Excel XML file that contains the inventory data to be reconciled.

The file selection dialog will allow you to navigate to the file containing your inventory records. If you are importing from an Excel XML file you will need to change the file type to “Excel XML all version” in the file type selection drop down in the file selection window.

Select the file you want to reconcile and click Open:

After you click Open, the following screen will be displayed indicating how many records were found in the file you selected.

If there is a product code in the import file that is inactive or invalid in the SMARTSystem inventory table the following message will be displayed:

All products that are inactive or invalid in the SMARTSystem will be added to the exception report that is displayed after the file is completely loaded.
After the file is completely processed an exception report will be displayed along with a dialog box indicating how many records were processed. The number of records processed includes records on the exception report and records that were successfully matched to the active inventory.
The exception report shows all of the products found in the file that could not be found in the SMARTSystem database. These products will need to be corrected (modified) in order for them to be reconciled.

After the import process is complete you can easily check the quantities that were imported by sorting the inventory data grid by the Quantity column in descending order. To do this, click the Quantity Column Header twice to bring all of the numbers to the top of the list.

Once you are satisfied with the inventory quantities, and you are 100% sure that no one is running Inventory Receiving or Reconciliation. Click Save to reconcile the values in the list. Blank Quantities are ignored.
Once the Excel Spreadsheet has been imported into the Inventory Reconciliation program you must click SAVE to update the inventory quantities. If you do not click save, no adjustments will be made to your inventory.

When SAVE is selected a copy of the data before processing will be saved on an excel spreadsheet. The spreadsheet will be saved automatically in C:\WFSDATA\Excel with a file name
Inventory Reconciliation – MM-DD-YYYY_HH-MM.xlsx
Note: Excel is installed on the PC you are using
Subtract Open Orders from Quantity:
This feature was added to provide a way to compensate for product that is in the cooler and being counted, but already sold on sales orders. The reason this was done is that when a Sales Order is created in the SMARTSystem the product is immediately removed from inventory; however, some of our users do not pick the order the same day it is entered. This creates a condition where some of the inventory in the cooler is not shown in the SMARTSystem.
To handle this condition the “Open Orders” column was added to show the quantity of each product that is currently on Sales Orders that have not yet been invoiced. The “Subtract Open Order From Quantity” feature was added to subtract the quantity of product on sales orders that have not been invoiced from the physical count entered into the Inventory Reconciliation program.
This feature is selected by checking the “Subtract Open Orders From Quantity” box:

When this box is checked a new column is displayed to show the New Available quantity that inventory will be set to after subtracting out the Open Orders. This will become the new “On Hand” quantity when the Save button is clicked and the inventory is reconciled.

Explanation of this example:
There are currently 10 on hand and 16 on open orders. This means that there 10 units available for sale before the reconciliation and 16 items that have been sold but are not yet invoiced. When the “Subtract Open Orders From Quantity” box is checked the value of 16 will be subtracted from the quantity entered into the Quantity box to yield the correct New Quantity Available to sale (26 – 16 = 10).
Add Quantities to Available Balance:
This feature was added to allow the Inventory Reconciliation program to be used for bulk inventory receiving.
Effective June 13, 2013 you are allowed to enter a negative quantity, for example “-25”
To use this feature check the “Add Quantities to Available Balance” box:

When this is checked all quantities entered will create new receiving lots for the product. After checking the box simply enter the quantity of each product that needs to be added to inventory and click SAVE. This will increase the available quantity by the amount entered into the quantity box.
“Subtract Open Orders from Quantity” feature is disable when “Add Quantities to Available Balance” is checked.
Manage Staged SMARTScan data:
This feature was added to provide a way for SMARTScan users to preview and modify the data collected by the SMARTScan software before reconciling it into the live inventory.
This feature is now a mandatory step between retrieving the data from the SMARTScan devices and reconciliation.
The SMARTScan procedure has been changed as follows:
- Cradle the SMARTScan device.
- Click the “Get Data from SMARTScan” button
- Respond to this prompt

- Clicking “No” will cancel the operation
- Clicking “Yes” will cause the SMARTSystem to communicate with the SMARTScan device and retrieve its Inventory Data.
- This step can be repeated for each SMARTScan device and all of the data from the SMARTScan devices will be stored in the Staged SMARTScan Data table to be managed when you are ready
- After the SMARTScan data is collected from the device it is then stored in a Staging area to be reviewed and edited before being reconciled.

- This data can be edited, saved and recalled at a later time.
- All fields on this screen can be modified by the user.
- Rows can be deleted by selecting the row and pressing the delete key.
- ONLY the rows that are marked as “Selected” will be brought into Inventory Reconciliation.
- After making changes the user can choose from the following buttons:
- “Save Changes” to save the work they have done
- “Exit” to exit the program without saving changes
- “Export to Excel” to create an Excel Spreadsheet from the Staged SMARTScan Data in its current form.
- “Move Selected Items to Inventory Reconciliation” to import all “Selected” records into the Inventory Reconciliation program to be reconciled when the user clicks the “Save” button in the Inventory Reconciliation program.
- Note – this process purges the Staged data at when it is clicked clearing the system to be ready for the next Inventory Reconciliation Cycle
- The user is presented with a final opportunity to modify the data in the Inventory Reconciliation program before clicking “Save” to reconcile the inventory from the SMARTScan devices.
Questions and Answers
If you have any questions or need support, please contact us at Support@Floralcomputer.com or call 727-483-5306for assistance.
Problem: When working with Inventory Reconciliation, you click on the “Get Data from SMARTScan” button. Your program freezes and a Windows error message appears informing you the SMARTSystem program has closed.
The following error message will be logged in the SMARTSystem log files:
Message:Unable to load DLL ‘rapi.dll’: The specified module could not be found. (Exception from HRESULT: 0x8007007E)
Solution: To use a scanner, the “rapi.dll” file will need to be installed. A Microsoft program – Windows Mobile Device Center – will need to be installed on the computer that will be using the scanner before it will interface properly with the SMARTSystem. The Windows Mobile Device Center program may be downloaded at the following link: https://support.microsoft.com/en-us/kb/931937.
Before downloading and installing the Windows Mobile Device Center software program, verify which type of Windows operating system you are using – 32 bit or 64 bit. This can be done by going into the Windows “Control Panel” and clicking on “System.” Download the appropriate version for your operating system.
Once installed, you will see the icon on your Start menu for the software, as shown below:
![]()
Should you get the message “Device driver software was not successfully installed,” you may safely ignore it. The software has installed the rapi.dll file needed to run the SMARTScan function.
The Windows Mobile Device Center still needs to be configured. Launch the program and accept the License Terms.

If you do not have the scanner attached to the computer, you will see the following screen:

With your mouse, hover over the menu item “Mobile Device Settings.” Click on the “Connections settings” menu item and configure as you see in the screen below:

The scanner will now work within SMARTSystem.