
How to Add Vendors
- In the file menu bar select the word “Vendors” from the list.
- In the drop down list under Vendors choose “Vendor Entry.”

- A pop up window entitled “Vendor Table Maintenance” will open up to the tab called “General Info.”

- Type the information for your new Vendor Entry.
Vendor Number must be alpha numeric.
- Required fields are Vendor number, Vendor name and Vendor Type (choose from the dropdown list):

- The Purchase Order Tab requires that Ship Via information be chosen from the dropdown tab.

- Next you need to decide what Vendor Terms are to be selected for the vendor. If you do not choose terms you receive this message:

Choose Vendor Terms:

- If you click the Add button after adding terms your new Vendor is added and a new record to input vendor information will appear.

**Even though this is all the required information needed for a vendor entry, it is recommended that you fill out the tabs as thoroughly as possible.
Please see Management Training #3B for a more complete explanation of Vendor maintenance.
SMARTSystem Management Training Series
Training Session #6D –Box Rate Based Landed Costs Setup
Purpose:
To define the sequence of actions needed to establish Vendor Box Rate based landed costs for Purchase Orders.
Keywords:
- Box Rates – Box Rates represent all of the shipping costs associated with getting the box to you. These costs can include: box charges, freight, customs duties, ground transportation, etc.
- Full Box Equivalent – THIS DOES NOT APPLY TO BOX RATES.
- Unit of Measure – a standard unit to describe a box size or units such as an each, a bunch or a stem.
- Country/Region – is a field in the Vendor table that represents an area from where products are shipped.
Overview:
A Vendor/Farm identifies how to calculate Landed Costs when Purchase Orders are created.
Box Rate based Landed Costs are typically established by Country/Region. For example, the country Colombia would breakdown transportation costs by Region for Bogota and separately for Medellin due to the cost based on location.
When using Box Rates for the State of California it can be sub-divided into zones, such as, Northern California, Central California and Southern California.
Setting up Box Rates to calculate Landed Costs on Purchase Orders includes:
- Defining Country/Region
- Identify Units of Measure to include in this process
- Setting a Box Rate for each Country/Region
- Assigning Country/Region to respective Vendors
- Setting Vendors to calculate Landed Costs by Box Rates
Procedures:
1. Determine the Country/Region that you want to establish box rates to determine Landed Costs.
2. Determine your average Landed Cost per box size (Unit of Measure) for:
A. Full Box
B. Half Box
C. Quarter Box
D Eighth Box
E. etc.
3. Make sure you have the Box Size defined in the Unit of Measure table which is found on the INVENTORY Menu:

There are 3 required parameters:
- Unit of Measure Code (up to 3 characters)
- Unit of Measure Description
- Box Type (general category, for example HB=half box) this is required for this entry to show on the Country Box Rates table (see #5 below)
Since the Unit of Measure Code is up to 3 characters and you may have more than one box type, for example HB (half box) can use the third character of the code to make it unique. For example, if you have 3 types of half boxes you can define them as:
- EHB (Ecuador half box regular)
- EHS (Ecuador half box small)
- EHL (Ecuador half box large)
- Establish Country/Region Table which can be found on the MANAGEMENT Menu. The Country/Region Table Maintenance looks like this:

Enter the Country/Region Code and the Name of the area. To remove an entry, highlight the first column and press the delete key on your keyboard.
- Select the Vendor View and sort by Country/Region to get all of your vendors for the Country/Region you are working with in one place.

- Select Vendors for the Country/Region you are working with and make sure the correct “Country/Region” is displayed. If not, use the drop down menu to select the correct Country/Region for this vendor.

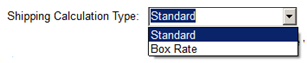
7. Select the Purchase Info tab and change the Shipping Calculation Type to “Box Rate” (near the bottom of the screen below):

8. Click MODIFY to save this information.
9. On the MANAGEMENT Menu, select Country/Region Box Rates and the following screen will be displayed:

10. Select the Country/Region that you are working with and enter your Box Rates that will be used to calculate Landed Costs for this Vendor’s purchase orders. Press enter to SAVE.
- When your entries are saved you can update vendors for the selected Country/Region by pressing the “Update Vendors” button. If you do not want to update an existing Vendor Box Rate, click “Do not overwrite existing Vendor box rates.” This update process will match the Vendor Table Country/Region with the Country/Region in this Box Rates Table.
- You can verify the Vendor’s Box Rate for the Country/Region you are working with by selecting a Vendor:

- The following is an example of how the Box Rates work with an Ecuadorian Vendor:
The Box Rate shows the Base Freight Cost at $12.75 for a QB (quarter box) which is set for the vendor:

In the purchase order you can add the Surcharge percent for product like Roses:

You can also add Other Vendor Charges to match with the Vendors Invoice.
See the result in the screen below:
- The Other Vendor Charges of 1.07 are entered and reflexed properly.
- The Surcharge of $3.375 is calculated correctly based on the 7.5% entered.
- The total Freight Cost of $17.195 is correct.

SMARTSystem Management Training Series
Training Session #3B – SMARTSystem Vendor Maintenance
Purpose: To introduce and provide orientation for Vendor information.
Keywords: The following is a list of key terms used in the SMARTSystem that you should be familiar with and understand.
- Ship Via – transportation code/description: your routes, carriers, etc. In-bound and Out-bound transportation. Used to identify the method of shipping.
- Drayage – is the transportation of goods over a short distance via ground freight and often part of a longer length haul to delivery product.
Vendor Maintenance
Introduction
Vendor information is primarily related to floral related purchase orders and buying, not business utilities and other related vendors. It can include Carriers.
By selecting the Vendor Menu you can access your Vendor information using the Vendor View or Vendor Entry.
There are certain pre-requisites that are required for vendor maintenance to function smoothly and are accessible from the Vendors Main Menu. Country/ Region information is accessible on the Management Main Menu. These pre-requisites include:
- Vendor Type,
- Vendor Terms,
- Ship via,
- Farm Entry and
- Country/Region.
The Vendor Table Maintenance program has 8 Tabs as illustrated below. These tabs are:
- General Info
- Purchase Info
- Accounting Info
- Mailing Info
- Remittance Info
- Contact Info
- Box Rates
- Farm Login

General Info
This screen will require entry of vendor pre-requisites for:
- Country/Region (on the Management Menu)
- Vendor Type (on the Vendors Menu and
- Farm Code (on the Vendors Menu).
The Farm Code is entered using the Farm Maintenance screen.

Vendor name and address information is entered on this screen. The Account Number is your vendor’s account number.

Vendor Type is user defined and you can add more Vendor Types on the Vendors Menu. SMARTSystem defaults for Vendor Types are: FRESH, PLANT, SHIPPING and SUPPLY.
The Order Arrival Days are used to calculate the estimated Arrival Date for a purchase order. In the vendors purchase order, the Ship Date plus Order Arrival Days is the estimated Arrival Date.
Each vendor can be associated with a Farm Code used when buying products and that will identify the source of the product throughout SMARTSystem.
Vendor Memos are used to make notes associated with each of your vendors. The memos are free form and it is recommended to enter date, persons initials and notes.

Purchase Info
This screen will require entry of vendor pre-requisites for:
- Ship Via (on the Vendors Menu) and
- Vendor Terms (on the Vendors Menu.

The Ship Via is used as the default carrier for this vendor’s purchase orders.

Vendor Terms is an informational field but required.
PO Form Delivery is informational to define the preference: Paper, Fax or Email.

PO Delivery E-Mail is the email address of who you want to receive your purchase orders via email. You can add more than one email address by separating each with a semi-colon (;). Do not enter a semi-colon as the last character.

CC Purchase Rep when checked will send an email to your Purchase Rep Email address (shown below).
Display Selected Code on PO document is not required. When selected, it will display either your Local (product) Code or Vendor Code or Manufacturer Code as checked.


As an example, depending on which Code selected above will show on the PO document:

The Purchase Rep’s name and Purchase Rep Email are stored for reference and as indicated above the PO can be sent to the Purchase Rep Email:

Default PO Instructions that are repetitive for the vendor are entered here and will be displayed on each new purchase order. You can also use this field as a reminder for your buyers that can be removed by them from the PO:

Shipping Calculation Type is selected to calculate landed costs on a purchase order. There are only two options: Standard or Box Rate. Additional setup information is provided in the Management Training Documents 6D.1 thru 6D.3.
Purchase Cost % for Landed Cost is typically used to store a recurring percentage, like 18% to calculate Landed Costs for trucking costs. This can also be use for the Ecuadorian Rose surcharges with the Add Percent to Surcharge on PO when the checkbox is set.
The checkbox to Add Percent to Surcharge on the PO will provide an option for purchase order to reclassify the calculation as a surcharge to account for it correctly:

Accounting Info
1099 Type is information only, but is required.

G/L Sales Account is only used by the Recipe Portal to override the Sales G/L for products by this Vendor G/L Sales Account.

The G/L Expense Account is required and can be set globally for all vendors using: Management Menu > Assign G/L Vendor Expense Accounts:


The remaining information on this screen is optional.
Mailing Info
Mailing Info is used to override vendor information on the General Info Tab.

Remittance Info
Remittance Info is normally not used. It is only used to override the remittance information in Quick Books only, when PO’s are exported.

Contact Info
This screen is used for additional vendor contact information:
- Contact Name, Phone and Fax Number, Primary Email Address
- Web Site URL
- Office Managers Name and Email Address
- Account Rep Name and Email Address

Box Rates
The Box Rates tab will normally be empty unless you set Shipping Calculation Type as Box Rate and follow the procedures to setup and maintain box rates:

Box Rates are used as an alternative to calculating landed costs based on freight rates and box cubes. This tab is used to establish an average cost per box type used to calculate landed costs when entering purchase orders.

The Country/Region Table Maintenance under the Management Menu in conjunction with your Units of Measure table are used to generate these entries. Refer to Management Training Document 6D.3. A separate training session should be scheduled if you want to use this feature.
Farm Login
The Farm Login Information is needed when the Farm Portal is activated. The User Name and Password for the Cargo Agent Interface allows the Farm to login and access their purchase orders.

The Cargo Agent Name entered on this screen will appear on the Farm’s printed label.
The Cargo Agent Email is not currently used at this time. This field can be left blank.
Practice Drill
The purpose of Practice Drill is to get you more familiar with the SMARTSystem and comfortable using it.
- Go to the VENDORS Menu and select VENDOR VIEW.
- Select a vendor you are familiar with and double click on that vendor. The vendor information will be displayed.
- Click through the tabs and verify the information to be correct. If you make a change click MODIFY before exiting.
- Add a new vendor.
Questions and Answers
If you have any questions or need support, please contact us at Support@Floralcomputer.com or call 727-483-5306 for assistance.