
SMARTSystem Management Training Series
Training Session #17D – How to Configure QuickBooks Customer Jobs in SMARTSystem
Purpose:
To provide information on how to setup Customer Jobs to import into QuickBooks correctly.
Overview:
Here is the QuickBooks side and the SMARTSystem side.
- QuickBooks terminology for your desired setup is Customer Jobs. Here is a link and information for you to work with:
b. QuickBooks Instructions

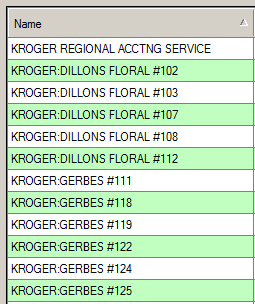
2. On the SMARTSystem side your Customer table needs to have the names setup like this:
a. The main office is without the semi-colons
b. The Stores are with a semi-colon, for example KROGER: DILLIONS FLORAL #102
SMARTSystem Management Training Series
Training Session #17C – Create a QB Invoice Register
Purpose:
This document will outline how to create only an Invoice Register in QuickBooks which is not part of their reporting.
Overview:
The SMARTSystem EOD produces an Invoice Register and after importing sales invoices and credits to QuickBooks we need to produce a QB Invoice Register.
These two Invoice Registers, QuickBooks and SMARTSystem, can be compared to verify totals transferred and recorded in QuickBooks.
Establish Invoice Register in QuickBooks:
Here are the steps to create this report:
- Select from the menu REPORTS > Sales > Sales by Customer Summary

2. Click Customize Report in the upper left corner of the screen:

3. Select the Display Tab and enter the information needed:
a. Dates = Custom
b. Report Basis = Accrual

4. Select the Filters Tab and create a Filter by Transaction Type = Invoice

5. The Header/Footer Tab does not change.
6. The Fonts & Numbers Tab does not change.
7. Create and fine tune this Invoice Register:


8. Click Memorize to change the report name and save it for future use:

Before:

After:

9. Click OK and Click Refresh:

10. You are now ready to use your QuickBooks Invoice Register to compare against your SMARTSystem Invoice Register.
* End of Document *
SMARTSystem Management Training Series
Training Session #17B – SMARTSystem, QB Importer and QuickBooks Setup
Purpose: To establish the correct program settings for the SMARTSystem, QB Importer and QuickBooks based on the customer’s’ requirements.
Overview:
Section I is to establish settings for exporting SMARTSystem G/L accounts to QB for proper accounting of transactions.
Section II is to clearly define the settings on how purchase orders are being processed in QB.
Setting your Accounting System preferences in the SMARTSystem is done by an FCS Support person. They must log in under programmer security:

To select your Accounting System preferences in SMARTSystem:
Go to the Control Info menu > Utilities > Select Accounting System.
Section I
It is required that you setup and coordinate the G/L accounts between SMARTSystem and Quickbooks.
The G/L Account Descriptions are used to update QB, therefore when entered into the SMARTSystem they are correctly written exactly the same way, including upper and lower case letters. For example:

To use the G/L accounts established in the SMARTSystem on transactions being exported to QB, it is necessary to set the checkbox in your Selected Accounting System to “Export GL Accounts to QB” as shown below:
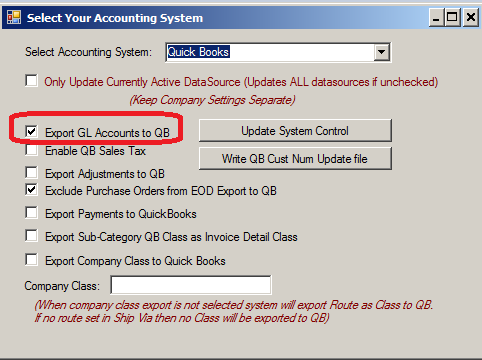
Click “Update System Control” to SAVE before exiting.
QB Importer:
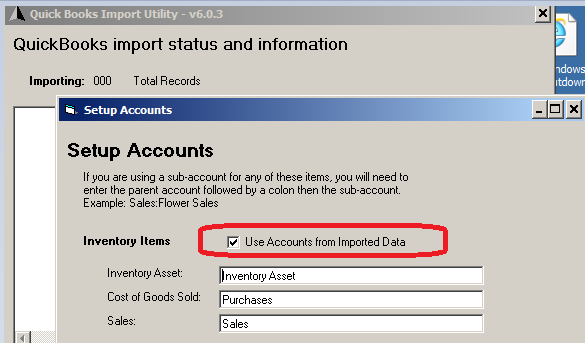
When SMARTSystem is generating the G/L transactions the checkbox “Use Accounts from Imported Data” need to be set.
Section II
There are three areas to setup with Purchase Orders.
SMARTSystem:
To select your Accounting System preferences in SMARTSystem:
Go to the Control Info menu > Utilities > Select Accounting System.
When NOT processing Purchase Orders in QB, the two items circled in red are to be set as shown in the example below. When PO’s are being processed in QB reverse this sequence.
![]()
Click “Update System Control” to SAVE before exiting.
QB Importer:
When SMARTSystem is generating the G/L transactions the checkbox “Use Accounts from Imported Data” need to be set.
QuickBooks:
QB Inventory creation from SMARTSystem is OK as an Inventory Part when the “QB Inventory and purchase orders are active” is not checked in the QB Preferences because there will be no costs, sales or average cost creation. Inventory will go negative with sales coming in, but does not have any impact on cost of goods.
- Preferences is turned off (see Preferences on Edit Menu)

When QB Preferences are turned off:

* * End of Document * *
SMARTSystem Management Training Series
Training Session #17A – SMARTSystem QuickBooks Employee Name Setup
Purpose: The purpose of this document is to detail how to make QuickBooks employee records align with SMARTSystem to permit successful importing of the sales reps associated with invoices.
Overview:
It is a prerequisite that all of the staff that have invoices exported to accounting be entered, manually, into QuickBooks before importing invoices. QuickBooks Import tool does not create new Employee records in QuickBooks because there are too many variables associated with this process to perform this action accurately.
The Middle Initial: The compatibility issue revolves around whether or not the salesperson has a middle initial. If there is no middle initial there is no issue.
SMARTSystem appends a period (.) to the middle initial to make sure it is easy to read when displayed or printed. This can cause incompatibility with QuickBooks which does not automatically append a period to the middle initial of the employee.
The SMARTSystem staff name with a middle initial will look like this:

In the QuickBooks Employee Center the middle initial must be present and have a period after it or it will not be recognized during the import process.
To modify an existing Employee in QuickBooks, open the Employee Center:
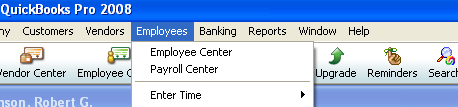
Then right click to select the employee you would like to edit:

Then Left Click on the Employee and Select “Edit Employee”

Once you click “Edit Employee” the following screen will appear in Quick Books:
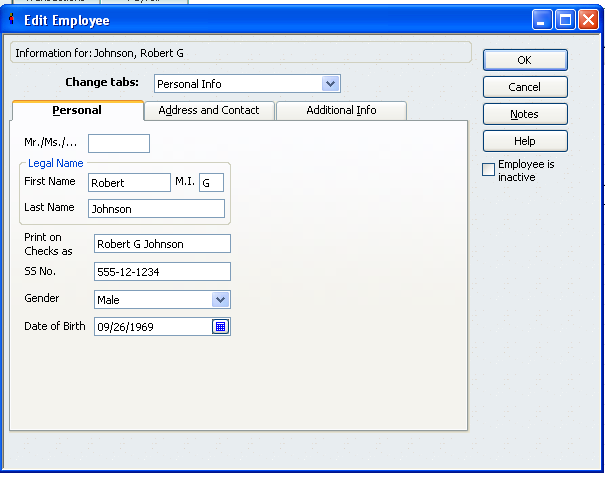
To add the period to the Middle initial, click to the right of the Middle initial in the M.I. field and type a period.

Click OK when done to save the change to the Employee Record.
No Middle Initial: If the sales person record in SMARTSystem does not have a middle initial, nothing is required in QuickBooks for compatibility. The Period is NOT added to staff records with no middle initial.
SMARTSystem Management Training Series
Training Session #16A – Go Live Testing Protocol Checklist
Purpose: Provide a smooth SMARTSystem Go Live start-up by fulfilling the following checkout protocols.
Procedures:
Each test point is summarized below and should be worked by the manager of that are and the people doing the work. The objective is for each of your staff to do their daily work using the new system and to resolve any issues.
Testing Dialogue and Checklist:
Maintenance
There are 3 major tables which require knowledge and understanding:
- Customer
- Vendor
- Inventory
From these major tables there are numerous sub-tables that can be affected.
Normally, certain people within the organization are responsible for creating new entries and maintaining existing data, for example:
- Customer information is maintained by the Credit Manager or Accounting
- Vendor information is maintained by the Senior Buyer or Accounting
- Inventory information is maintained by person who coordinates the buying and selling of products. We call this person the Inventory Administrator
Product Ordering
Product can only be ordered using the Purchase Order process and this is usually done by the Buyer(s).
When a new item is establish the Vendor and Inventory items both need to be setup for the Buyer.
PO Entry and Receiving on the Purchase Order menu is used to create a purchase order and receive product.
Inventory Receiving
Purchase Orders or Inventory Receiving are used to add inventory to the SMARTSystem.
Purchase Orders in the “on order” status (OR) can be adjusted. Adjustments should always be done prior to receiving product.
You can create a Receiving Worksheet (W/S) for the warehouse either before or after the PO is received. Receive the entire purchase order.
Under other conditions where only some of the product can be received create a Backorder PO.
Inventory Receiving, the first sub-menu item under inventory is used to Receive product that is note purchase from a vendor. This can be used for creating bouquets internally or non-standard purchase of products.
Sales Orders
There are 2 types of Sales Orders to create:
- Pre-books which do not reduce inventory until converted to a sales order
- Sales Orders that do reduce inventory
Process these different orders and create:
- Pick Tickets
- Invoices
- Labels, if needed
Invoicing
Depending on who is responsible in the organization for invoicing there are several options to invoice sales orders and each should be used by the appropriate staff:
- Sales Order Entry provides a button to create and print
- Pick Ticket and
- Invoice
- Warehouse Order Management
- Pick Ticket
- Invoice and
- Delivery Labels
This process captures the number of pieces for delivery, updates the sales order and prints the number of pieces on the bottom of the invoice.
The Number of pieces entered above show on Route Reports.
- Sales Document Processing can be used to process a specific sales order or a batch of items by double clicking the heading above:
- Pick Ticket
- Invoice and
- Delivery Labels
Shipping
Pick Tickets sent to the warehouse are used to pick product, identify number of pieces, to print delivery labels and invoices (optional):
- Warehouse Order Management
- Pick Ticket
- Invoice and
- Delivery Labels
This process captures the number of pieces for delivery, updates the sales order and prints the number of pieces on the bottom of the invoice.
The Number of pieces entered above show on Route Reports.
The Pull List is also used by the warehouse to pull product for sales orders based on the Delivery Date, depending on how you are organizing the flow of information.
You can use the Load List for invoiced products to prepare for delivery.
Driver Check-in
Have the Drivers Check-in to record and verify the day’s activities.
Questions and Answers
If you have any questions or need support, please contact us at Support@Floralcomputer.com or call 727-483-5306 for assistance.
SMARTSystem Management Training Series
Training Session #16 – Go Live Event Checklist
Purpose: Provide a smooth SMARTSystem Go Live start-up
Keywords: The following is a list of key terms used in the SMARTSystem that you should be familiar with and understand.
- Go Live Event – Is the coordination of all activities to begin operations using the SMARTSystem.
Go Live Date Decision
The Go Live Date depends on two primary factors:
- Staff understanding of how to use the SMARTSystem and
- Using the new System to get their work done, without confusion.
Major Steps to achieve Go Live status:
- Imports are completed and information verified:
- Customers
- Vendors
- Inventory
- Staff comfortable using the SMARTSystem
- Staff using the SMARTSystem to simulate daily activity.
- Quick Books is up and running.
- Computers, printers and scanners setup and configured for daily operations.
- Inventory balance capture procedures established and working in a test environment:
- Fresh
- Supplies
- Decision to Go Live and set a date.
- Database cleared/reset after staff completes their training and testing.
- Actual inventory balance forwards input and verified
- Begin using the new System
Go Live Week:
- System Control settings:
- System Options
- Default G/L accounts
- Reset starting numbers for:
- Invoice Number
- Sales Order Number
- PO Number
- SMTP for emailing
- Make sure that SQL backup is running nightly
- Save SQL backup to an external drive to be rotated weekly
- Clear database of all transactions
- Remove inactive records from:
- Customers
- Vendors
- Inventory
- Enter PO Standing Orders, if not already done.
Note: remember the first PO entry is a real PO to be ordered.
- Enter Sales Standing Orders, if not already done.
Note: remember the first Sales entry is a real Sales Order.
- Take Inventory and enter Balance Forwards for:
- Supplies
- Fresh
- Begin Operations with the new System.
- When the day is finished execute the SMARTSystem End-of-Day checklist.
Follow-up Project:
Identify non-floral vendors to inactivate in SMARTSystem:
- Inactivate using Vendor Maintenance or
- Create a vendor excel spreadsheet
- Set status code to “I” to inactive for non-floral vendors
- Import inactive file
- Purge inactive vendors
Questions and Answers
If you have any questions or need support, please contact us at Support@Floralcomputer.com or call 727-483-5306 for assistance
SMARTSystem Management Training Series
Training Session #15 – Driver Check-in for Bucket Trucks
Purpose: To define the Driver Check-In procedure established for bucket truck operations.
Keywords: The following is a list of key terms used in the SMARTSystem that you should be familiar with and understand.
- Replication – Is a Microsoft term that means synchronizing databases. For example, synchronizing the sales and invoicing on the truck laptops with the main Server. This process is done automatically when the laptop is within wireless range of the Server and takes less than 10 minutes to automatically establish the connection and synchronize the data.
Pre-requisites:
- Laptop with the SQL Microsoft database installed and SMARTSystem
- Wired or wireless connection to the Server
Overview:
When each truck returns from its route the laptop needs to be turned on and connected to the local area network by direct wired connection or wireless connection.
The SMARTSystem activity that occurred on the laptop will be synchronized with the office Server within 10 minutes, assuming that the connection is established with the Server.
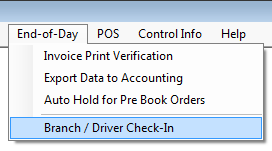
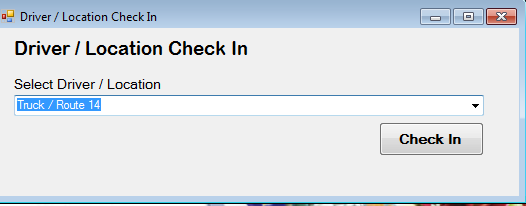
To initiate the Driver Check-in select the following menus:
End-of-Day > Branch / Driver Check-in
By selecting Branch /Driver Check-In the following screen will be displayed for you to select your Truck / Route:
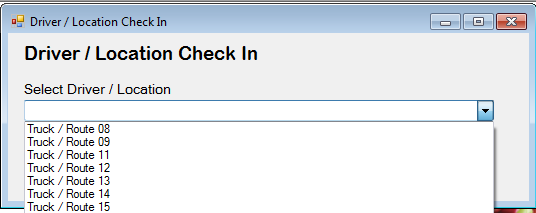
With the Truck / Route selected click the Check In button:
Questions and Answers
If you have any questions or need support, please contact us at Support@Floralcomputer.com or call 727-483-5306 for assistance.
SMARTSystem Management Training
Training Session #14 – Physical Inventory
Purpose: To capture physical inventory counts using laptops at multiple locations.
Keywords: The following is a list of key terms used in the SMARTSystem that you should be familiar with and understand.
- SKU is an abbreviation for stock keeping unit that identifies a specific stock item in inventory. In the SMARTSystem, SKU can be your Product Code, the UPC or GTIN numbers.
Pre-requisites:
- Laptop or tablet
- Wired or wireless connection to the Server
- Bar Code Scanner connected to the laptop/tablet
Overview:
The Physical Inventory process consists of 4steps:
- Scanning the bar code of inventory items is the first step. The bar code can be your product code, UPC or GTIN codes,
- Stage inventory scans from one or more devices so that like products from different locations can be consolidated,
- Close all Physical Inventory scanning programs to prevent changes during the posting process, and
- Post inventory quantities.
The Physical Inventory program is selected from the Inventory Menu:
INVENTORY > Physical Inventory
which displays the following screen:
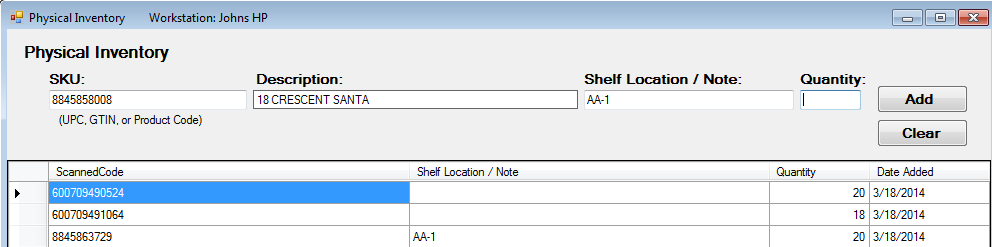
Scanning:
Using the bar code scanner, scan the bar code and the information from the bar code will be displayed in the SKU field in the top portion of the screen above. If the code is found in the Inventory Table the product description will be displayed in the Description field and the cursor is positioned in the Quantity field.
Back tab to enter a repetitive Shelf Location / Note, then tab to the Quantity field and enter the item count.
This is repeated until all items are scanned and accounted for thereby completing your area.
Stage:
When scanning is completed, the items scanned are listed as illustrated on the screen below:

The next thing, after everyone has completed their scanning, is to select the Inventory Reconciliation program:
INVENTORY > Inventory Reconciliation
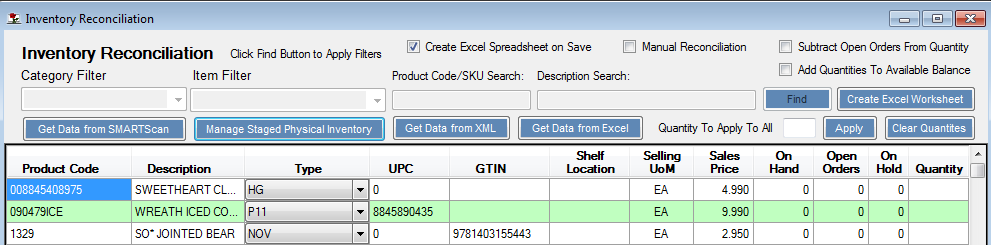
Click the blue button under Item Filter, Manage Staged Physical Inventory. The following Manage Staged SMARTScan Data will be display with all of the items scanned including the Workstation, Date and Time Scanned, Scanned Code (SKU) Shelf Location and Quantity.

At this point you can click the Exit button and close the scanned information without losing it. You can also make changes to the line items, including Quantities or deleting lines as shown below.
If you want to delete one or more lines, highlight the lines (holding the Shift key you can highlight multiple lines) and press the Delete Key on the keyboard. This will remove the highlighted lines from the scanned items.
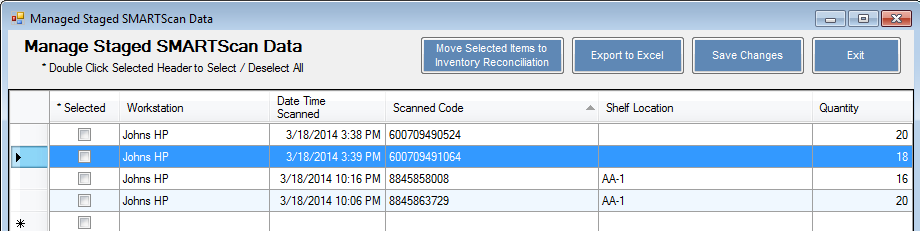
The second button can be used to export the items listed to Excel.

Normally, you select the items you want to Post. You can select them individually or all of them by double clicking the *Selected heading. Once the items are checked that you want to Post to update inventory, click the first blue button Move Selected Items to Inventory Reconciliation.
You are now ready to Post your scanned inventory quantities.
Close:
Before posting, make sure all scanning is completed and the Physical Inventory program is closed. Closing the Physical Inventory scanning programs will prevent changes during the posting process.
Post:
The scanned records will populate the Quantity column on the Inventory Reconciliation screen and click SAVE to process.
Keep the checkbox marked that will Create Excel Spreadsheet on Save to provide an audit trail for each Post.
Questions and Answers
If you have any questions or need support, please contact us at Support@Floralcomputer.com or call 727-483-5306 for assistance.
SMARTSystem Management Training Series
Training Session #13 – SMARTSystem Operations and Support
Purpose: To understand how the SMARTSystem is updated and the steps for
each User to take in this process.
Keywords: The following is a list of key terms used in the SMARTSystem that
you should be familiar with and understand.
- Click-Once Deployment – Microsoft per user deployment technology that allows for automatic updates of software via the internet.
Overview:
These changes and improvements to SMARTSystem software are published to you
periodically with an alert message “Update Available” when you click the
SMARTSystem icon. The alert message looks like this:

Each PC user should click “OK” and the program update will automatically
install. If you want to bypass the update, click the red “X” and the next time you click the SMARTSystem icon you will be prompted again for the update.
If you click “Skip” you will not be prompted again for an update. This is the way
Microsoft designed it to permanently opt-out of the update process. To reactivate
the automatic update process, go to your internet browser and enter your link in the
address line:
“Yourcompanypublishingpoints.floralsoftware.com” to install your latest version.
It is very important that all Users receive updates to keep the SMARTSystem
program and your database synchronized amongst all Users. It is your
responsibility to maintain the current version by clicking “OK” on the message
above.
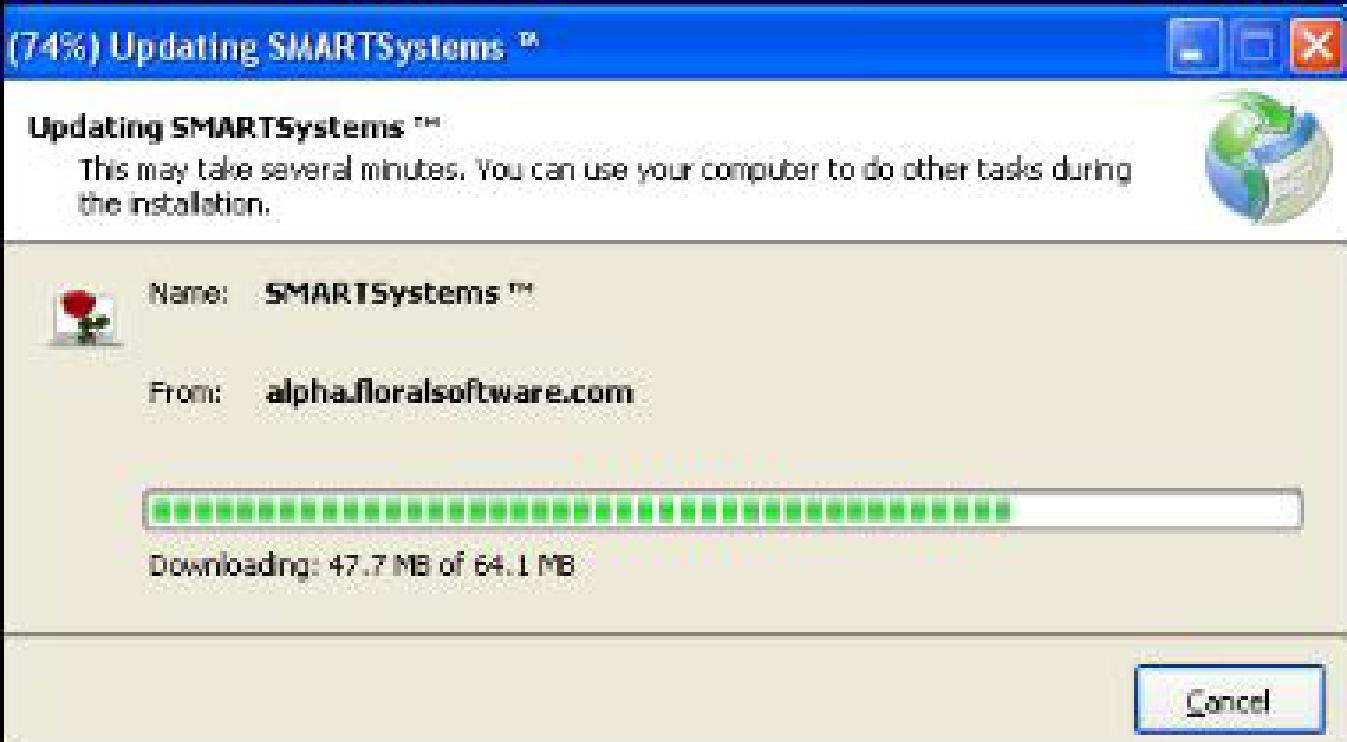
When you click “OK” to install the SMARTSystem updates, the following screen
will give you installation progress. The entire process normally takes less than 2
minutes, depending on your internet connection speed.
The only exception to the above procedure is for Terminal Server (Remote) Users
using a desktop icon to access the SMARTSystem. This does not apply.
Logos:
Prepare a high quality .jpg for creating the SMARTSystem Logos and Desktop. Please forward to Support@Floralcomputer.com for installation help.
Invoices and labels use 1024 x 681 just rename the files:
- largelogo.jpg,
- mediumlogo.jpg,
- smalllogo.jpg,
- labellogo.jpg
The Desktop logo uses 1280 x 1024 and name your file:
- logo.bmp
- The desktop logo.bmp must be placed inside of the Logo folder which contains a folder called background in order to render to the SMARTSystem desktop.
Questions and Answers
If you have any questions or need support, please contact us at Support@Floralcomputer.com or call 727-483-5306 for assistance.
SMARTSystem Management Training Series
Training Session #12 – INVENTORY PICTURES
Purpose: To provide the information and procedures needed to add inventory pictures to the SMARTSystem.
Keywords: The following is a list of key terms used in the SMARTSystem that you should be familiar with and understand.
- Pixels – Short for Picture Element, a pixel is a single point in a graphic image. Graphics monitors display pictures by dividing the display screen into thousands (or millions) of pixels, arranged in rows and columns. The pixels are so close together that they appear connected.
- .jpg – JPG files, also known as JPEG files, are a common file format for digital photos and other digital graphics. When JPG files are saved, they use “lossy” compression, meaning image quality is lost as file size decreases. JPEG stands for Joint Photographic Experts Group, the committee that created the file type.
- .gif – Pronounced jiff or giff (hard g) stands for graphics interchange format, a bit-mapped graphics file format used by the World Wide Web. GIF supports color and various resolutions. It also includes data compression, but because it is limited to 256 colors, it is more effective for scanned images such as illustrations rather than color photos.
- .bmp – Short for “Bitmap.” The BMP format stores color data for each pixel in the image without any compression. For example, a 10×10 pixel BMP image will include color data for 100 pixels. This method of storing image information allows for crisp, high-quality graphics, but also produces large file sizes. The JPEG and GIF formats are also bitmaps, but use image compression algorithms that can significantly decrease their file size. For this reason, JPEG and GIF images are used on the Web, while BMP images are often used for printable images.
- SMARTData Services – manages information for:
- wireless database interaction with the 3190 scanner and
- capturing pictures for use with the SMARTSystem and SMARTSite.
Pre-requisites:
SMARTData Services needs to be installed and setup before pictures can be added.
Pictures need to be captured and saved in your pictures folder. Pictures can be captured in any one of 3 formats: .jpg, .gif, .bmp. See definitions of each type in the Keywords list above.
To capture pictures that will be effective on a website and in the SMARTSystem you need to adhere to the following guidelines:
- The picture should be at least 250 pixels on the longest axis (Height if Tall Picture, Width if Wide Picture).
- The picture should not be greater than 950 pixels wide. Images wider than this could potentially clip on lower resolution screens (1024×768).
- Should not be greater than 700 pixels tall. Images taller than this could potentially clip on lower resolution screens (1024×768).
Overview:
- Open the SMARTSystem and Login.
- Select the Inventory Menu and sub-menu Inventory View.
- Use the filter criteria to select the product that you would like to add a picture.
- Double click the product to show it in the Inventory Maintenance Screen.
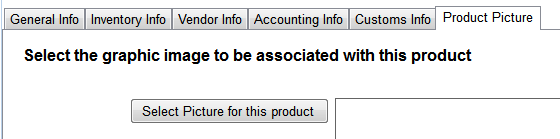
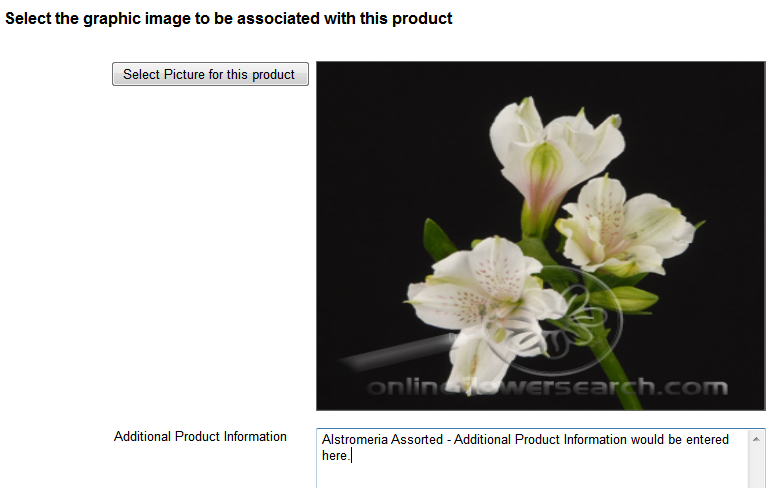
- Click the Product Picture Tab. *
6. Click the “Select Picture for this product” button to select a picture from the folder containing your pictures.
7. Find the picture you want to associate with the product and click the “Open” button.

8. Please be aware that when the picture is shown in the square area on the screen, it will be skewed to fit the square area. This does not affect how the picture will be saved or how it will appear on the website.
9. Enter any additional product information in the Additional Product Information Text Area:
10. After you have entered the Additional product information Click the Modify button to Save your changes
* NOTE: If the Product Picture Tab is not available please contact FCS Support and ask them to install the SMART Data Services module on your Server.